Sunday, 13 March 2011

Engine Breakdown

Engine Breakdown this weekend

Firstly built myself a nice little engine stand:

Then discovered a rebore will be needed as part of the piston has exploded so some bad scoring on the bore:

But no real big issue as I half expected that anyway:

I don't think this engine has been touched in many a year and the pistons are standard from manufacture. Some very tight bolts and studs.

Don't you just love gears and oil?


Another tool bought, hopefuuly only to be used once. Love playing with pullers though real engineers stuff!


So all stripped down, haven't touched the head yet, that will be next.

Saturday, 5 March 2011

The Build Begins

Okay started to put bits on instead of taking them off!

1st to go on was the centre stand all nicely painted, notice the stainless nuts, which are costing a fortune but in the end worth it I think.


Then came the headstock, new bearings fitted, ignore the top nut in the last picture as this will be replaced with a shiny new one when I get round to it.


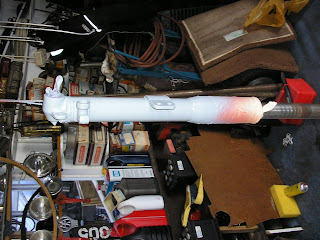
Finally front forks fitted, which is a bit of a cheat as I couldn't fit them properly as I need a service tool for pulling the stanchions through the top yoke (oh well another visit to the internet and Dragon Motorcycles)


I fitted the handle bars, to get a look but again these will be replaced with shiny new ones when time is ready. Like the way I've spun them round though to make it more of a drop handle model.

The other thing, is it's a wonder to me how people paint everything and then manage to rebuild without scratching the new paintwork as I'll have plenty of touching up to do.

One last thing first injury on the bike, got myself two nice blood blisters fitting the forks (OUCH) a few expletives were uttered, sympathy cards gratefully received.
So there we have it the build begins, lots of work to come but will fit front mudguard and old wheels for time being next which will give me a rolling chassis to work on.

Monday, 28 February 2011

Paint Shop

More painting, all undercoating, top coats this week and then can start to build some parts back on to the bike!


Friday, 11 February 2011

Now to start building

Just a quick update, not really done much on the project over last few weeks as been travelling with work!

Anyway, I decided to have the frame soda blasted, which was a great decision as it completely removed all old paint.

Frame has now had first coat of primer applied, more coats to follow.

Cost of Soda blasting £50


Saturday, 22 January 2011

Breakdown Completed

Okay, finished breakdown today so only component parts left (except engine and gearbox)

Again, good  British engineering (or is that simple) no real issues other than the manuals don't tell me how to split the front forks. However I have a cunning plan, went to see an old Motorcycle Engineer (really "old school") and he has restored about 10 BSA bikes. He said not only would he split the forks for me, he'll look at the gearbox and tell me if it needs any work or not. So big shout out to RJ Coopers of Cookstown.
If anyone's interested they should go and have a cup of tea with him as he's a real interesting guy to talk with and his know-how and knowledge is fantastic.

So next job is to start rubbing down the frame, and then start to paint :) decided to paint rather than powder coat as I want to keep it as original as possible.

Oh, one nugget of information Coopers gave me was it's going to be impossible to re-chrome just part of the tank where it was originally so will have to be totally re-chromed (big expense) when I'm ready.

So here's the latest pictures:


And here's the budget so far:

Shaft Puller £45
"C" Wrech £6.50
Assorted bearing pullers £20
Manuals and original workshop manuals £30
2nd Hand Haynes Manual £17
DragonFly Parts Book £5

Monday, 17 January 2011

Day two of Brakedown

Managed to spend a few hours breaking the bike down further today and got a lot accomplished.

Firstly had to buy a couple of tools (I'll create a list and budget at some point) a "C" wrench which was a great find and a shaft puller for the clutch main spindle.

The day's gone smoothly, the oil in the main crankcase was really disgusting very thick and white looking which is probably down to age.

Engine suspension arm came out no issue, didn't have to use hammer and chisel like it said I might in the books as nut came off no problem.

Clutch also came off, maybe a little to easily and I'm concerned woodruff key is to loose as the slot looks abused, so I'll have to investigate that at some point.

One good point to note, is that if removing engine bolts from left side you will have to remove gearbox to get the last one out as it's blocked by the gearbox casing. Not a problem for me as I was removing gearbox as well, but could be awkward if your hoping not to.

Removed engine as whole as I'll break it down seperately ready for the refurb along with gearbox.


next to come of will be front forks and rear wheel set up...

Sunday, 9 January 2011

Strip Down Starts


Okay, first day of strip down done, and must say really pleased with progress, nothing to confusing and didn't have to refer to manual once.

Managed to remove all body work and wiring loom (which went straight in the bin) so the engine/gearbox will be next.

Noticed that the bike has had some real dodgy repairs done on it in it's life time a  lot of non std. nuts and bolts around so will have to look at replacing all of them and try to get back to standard (will probably go Stainless as well).

Also the bike got introduced to what I'm referring to as her big brother hopefully neither will get jealous when I ride the other :)


This will be the last work for a while as I'm now travelling for next few weeks with work

7th Jan 2010

Okay, much research in last couple of weeks.

Managed to find a second hand Haynes manual as they went out of print in 77, also found copies of original Workshop Manual, Spare Parts Book and Instruction Manual.
These came from a company I found called Bruce Main Smith http://www.brucemain-smith.com/ who are worth speaking to for those missing bits of information.

Also a bit more news on the bike, I first thought this was not good news but having spoken to a few "experts" they told me not to worry. It turned out that the engine number didn't match the one on the reistration document. The engine in the bike is from 1954, so at some time the engine was swaped, but like I said everyone I've spoken to say's not to worry.

A few parts ordered so far, mainly specialist tools, again found a great company called Dragonfly, who seem rreally friendly and informative http://www.draganfly.co.uk/

Looking forward to getting started on the bike now